Have you noticed unsightly holes in your shower tile grout?
Don’t panic! While these imperfections can diminish the overall aesthetic appeal of your shower, they are not insurmountable problems. It’s essential to tackle these issues promptly to prevent more serious complications down the line.
Here’s the silver lining – these grout holes are surprisingly easy to repair!
This in-depth guide will walk you through a detailed, step-by-step process to effectively fix holes in your shower tile grout. Additionally, we will delve into the common causes of grout damage and offer preventive tips to help you steer clear of these issues in the future.
Transform Your Shower with Our Comprehensive Guide to Repairing Holes in Shower Tile Grout
Repairing those annoying grout holes may seem overwhelming initially, but it’s actually a manageable task. Allow me to guide you through the essential steps that will ensure your shower looks immaculate and inviting once more.
#1 Equip Yourself with Essential Grout Repair Tools for a Smooth Repair Process
Before diving into your grout repair project, it’s important to gather all necessary supplies to make the task efficient and effective. Here’s a comprehensive list of items you will need to ensure a successful repair:
- Specialized grout removal tools
- Caulk gun
- Grout that matches your existing tile color
- Grout float for smooth application
- A sponge for cleanup
- A bucket of water for rinsing
- Masking tape for sharp edges
Always remember to wear gloves and safety glasses to protect yourself while working on your shower. Having all your tools organized beforehand will streamline the entire process, making it less stressful and more enjoyable.
Also Read: Epoxy Grout VS Cement Grout
#2 Prepare Your Shower Area for Optimal Grout Repair Results
Now that you have your tools ready, it’s time to prepare the area for repair effectively. Start by applying masking tape around the grout lines where the holes are located.
This step is crucial as it will help keep the new grout in place, ensuring a clean and professional finish that enhances the overall look of your shower.
Next, carefully use your grout removal tool to extract the old, damaged grout. Be gentle to avoid scratching the tiles, and if you’re working in a shower environment, exercise caution to prevent damage to the waterproof membrane beneath the tiles. This preparation step is vital, as it creates a clean and stable surface for the new grout to adhere effectively and last longer.
Also Read: Why Grout Gets Stained And Damaged
#3 Ensure a Clean Workspace Before Applying New Grout
After you’ve removed the old grout, it’s time to clean the workspace thoroughly. Use a slightly damp cloth to wipe down the surface, effectively removing all dust and debris left from the grout removal process.
It’s essential to allow the area to dry completely before applying the new grout; a dry surface significantly enhances the adhesion of the new grout, ensuring a long-lasting repair that will keep your shower looking pristine.
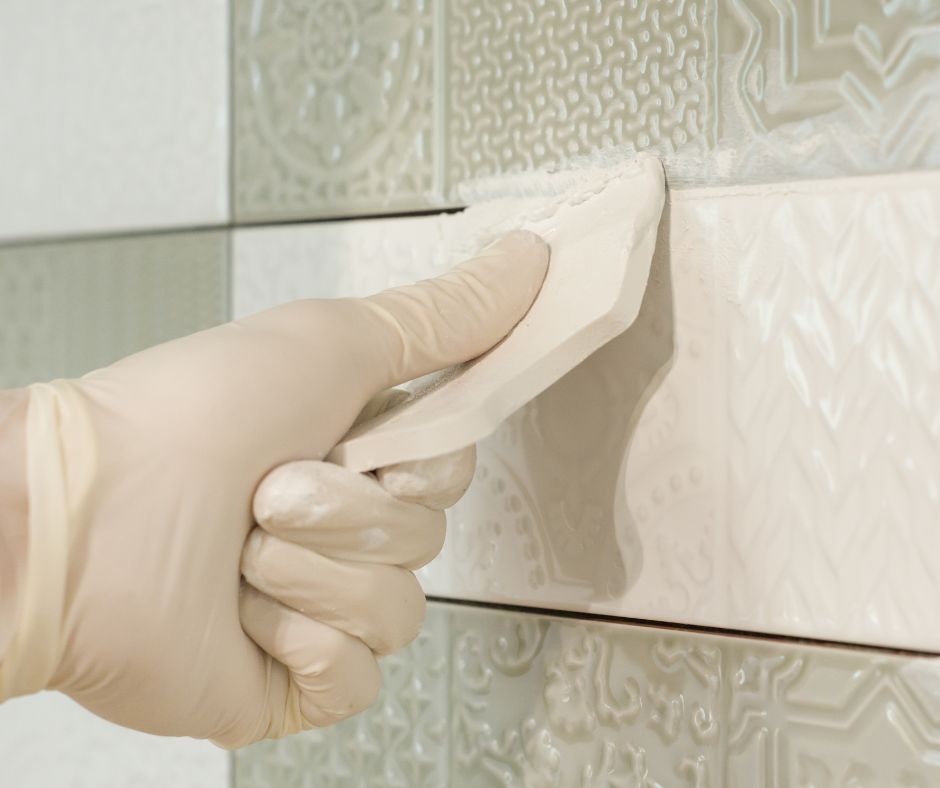
#4 Skillfully Apply New Grout for an Impeccable Finish
Now comes the exciting part! Prepare your grout according to the instructions provided on the packaging.
You want to achieve the perfect consistency – neither too watery nor overly thick. Utilize your grout float to apply the new grout over the holes, ensuring you push it in at an angle. This technique is crucial, as it helps fill all gaps and creates a smooth, even finish that looks professional.
Once the holes are filled, use the float to level the surface and remove any excess grout, ensuring a tidy and professional appearance. Taking the time to apply the grout skillfully will make a significant difference in the overall look and durability of your shower.
#5 Carefully Wipe Away Excess Grout for a Neat Appearance
After allowing the grout to set for a brief period, take your damp sponge and carefully wipe away any excess grout.
Be sure to rinse the sponge frequently to avoid letting grout dry on it, as this can complicate the cleaning process. This step requires patience and attention to detail, but achieving a polished, professional appearance is well worth the effort. Take your time to ensure everything is perfect before allowing it to dry completely and removing the masking tape.
Also Read: Regrouting Your Bathroom Grout
#6 Optional: Apply Grout Sealer to Enhance Durability and Lifespan
If you’re interested in enhancing the longevity of your grout, consider applying a grout sealer.
While this step isn’t mandatory, it can provide significant protection against moisture and stains, thereby extending the life of your repair. If you opt to seal the grout, be sure to wait a few days for it to fully cure before applying the sealer to achieve the best results.
Follow the manufacturer’s instructions for optimal application, and you will add an extra layer of protection to keep your grout looking fresh and vibrant for years to come.

Understand the Causes of Grout Damage and Implement Effective Prevention Strategies
Have you ever paused to consider what causes those unsightly holes in your grout in the first place? Understanding the root causes can help you mitigate them effectively.
The primary culprits are typically moisture and aggressive cleaning methods. Grout is inherently porous and can deteriorate over time, especially if it isn’t adequately sealed. Moreover, showers are exposed to constant water and frequent cleaning, which can exacerbate the problem.
Additionally, natural settling of the house can lead to minor shifts that create cracks or holes in the grout, making it more susceptible to damage.
To prevent future holes from developing, consider sealing your grout after installation or repair.
Using gentle cleaning products can also prolong the life of your grout. Avoid harsh chemicals that can degrade grout over time and lead to costly repairs.
Regularly inspecting your shower grout for any signs of damage can also be beneficial.
Addressing any issues as soon as they arise will help prevent them from worsening into more significant problems that could compromise the integrity of your shower.
Essential Insights for Successful Grout Repair
Repairing holes in your shower tile grout is entirely achievable on your own, and doing so can prevent more significant, costly issues from arising in the future. Taking proactive measures today can save you headaches tomorrow.
However, if you prefer to have professionals manage this task, we are here to help. We can efficiently complete the regrouting process, relieving you of the hassle while ensuring high-quality results.
Regardless of your choice – addressing those holes will help maintain your shower’s functionality and aesthetic appeal for years to come!
What to Do If Your Contractor Left Holes in Your Grout?
If you’ve recently undergone renovations in your bathroom and discovered holes in the grout, it’s essential to reach out to your contractor without delay. A reputable professional should ensure that no holes or imperfections remain in the grout.
Most reliable contractors will be more than willing to return and rectify these issues promptly to maintain customer satisfaction.
How to Effectively Repair Pin Holes in Grout?
To address pin holes in the grout, start by cleaning the area thoroughly and lightly dampening the surrounding grout. Next, press a small amount of grout into the holes, smoothing the patched area with your finger for a seamless finish that blends perfectly with the existing grout. This attention to detail will ensure a flawless repair.
What’s the Correct Process for Repairing Missing Grout in the Shower?
Fixing missing grout is quite similar to repairing holes. Begin by ensuring the area is thoroughly cleaned, then apply new grout to the affected spots. Use your grout float to smooth it out, ensuring a level finish that matches the surrounding grout. Finally, remove any excess grout and allow it to dry completely for optimal results that will enhance the longevity of your shower.

The Article: Holes in Shower Tile Grout? Effective Solutions Inside! first appeared on https://writebuff.com.
The Article Effective Solutions for Holes in Shower Tile Grout Was Found On https://limitsofstrategy.com


Ah, the infamous shower grout holes—truly the modern-day equivalent of “death by a thousand cuts,” but with a much less poetic name. I must confess, my own shower has looked a bit like Swiss cheese lately, complete with the charm of dealing with moisture and mold like it’s some bizarre pet I’ve adopted. Honestly, what is it with these little imperfections popping up just when you think your ceramic palace is all spick and span?
Your blog post brings up a common issue that many homeowners face, and I appreciate the practical approach you’ve taken to address it. I think the ease of repairing grout holes can often be understated; many people assume they need to call in a professional for what seems like a daunting task.
You bring up a really interesting point about how people often underestimate DIY home repairs, especially when it comes to something as specific as grout holes. I’ve actually had a few friends who were convinced they needed to hire a professional for what turned out to be a pretty straightforward fix. It’s kind of fascinating how the idea of tackling a home repair can feel so daunting, yet once people dive in, they realize it’s not nearly as complicated as they thought.
You raise such a compelling point about the perception of DIY home repairs and how often they can be more manageable than they seem at first glance. It’s interesting to think about the psychological barrier many people face when considering whether to tackle a home project themselves. The fear of making a mistake or not having the right skills can be overwhelming. Yet, once they get their hands dirty, many discover a sense of competence and accomplishment that they didn’t expect.
I completely relate to the struggle with shower tile grout! We recently had similar issues in our bathroom, and it felt daunting at first. I appreciate how you’ve broken down the steps for repairs—it makes the whole process much less intimidating.
Your journey with shower tile grout sounds like quite the adventure. It’s like the bathroom version of climbing a mountain—exhilarating when you reach the top, but the struggle to get there can be a real test of patience and sanity. And honestly, who knew grout could be such a drama queen? One minute it’s all shiny and white, the next it’s broadcasting its rebellious brown streaks.
It’s refreshing to see a focus on such a common yet often overlooked issue like grout damage in shower tiles. Many homeowners, including myself, have experienced the frustration of unsightly holes, but the positive take on the repair process is encouraging. It’s true that these issues, if left unchecked, can lead to more significant problems, such as mold growth or structural damage, due to water infiltration.
Dealing with grout damage can really be a hassle, yet it’s one of those things that often gets pushed to the back of our minds until it snowballs into a bigger issue. Your experience is spot on; it’s easy to overlook those small holes, but as you mentioned, the potential for mold and water damage makes addressing them earlier rather than later essential.